|
This section will familiarize you with the features of E-Z Blaster Web Accelerator Version 3.0.
1. Installation.
2. Using E-Z Blaster Web Accelerator.
3. Advanced Options.
4. Uninstalling.
Need further assistance? Feel free to contact us for product information or feedback.
Detailed Installation Instructions
The minimum system requirements are a Pentium 200MHz with 64MB RAM, and at least
5MB of hard-drive space. It works with Internet Explorer 4.0 as well as Netscape
Communicator 4.0 or any later releases of both browsers.
1. Download.
Your ISP will provide you with a location to download the
E-Z Blaster Web Accelerator installer.
Download the installer to your desktop.
Once the download has completed, proceed to Step 2.
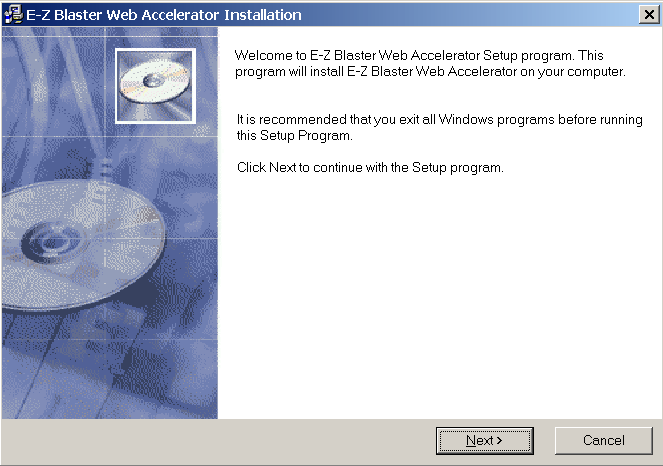
2. Install.
-
After downloading the E-Z Blaster Web Accelerator installer onto
your Desktop, an icon as shown below will be on your Desktop. Double-clicking
on the icon will launch the installer.
-
The installer will guide you through the complete setup process.
3. Connect.
-
As this is your first time launching the product, you will be prompted for a username and password. Enter the username and password provided to you by your ISP in the fields provided.
Click OK. E-Z Blaster Web Accelerator will connect to your ISP.
-
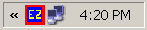
After installing E-Z Blaster Web Accelerator, an icon as shown below is placed in your system tray. Opening any web browser launches E-Z Blaster Web Accelerator.
4. Browse the Web.
Browse the web as you normally would.
When finished, simply close your web browser, as you normally
would, and E-Z Blaster Web Accelerator will remain idle in your system
tray.
If you want to stop the application after browsing select Stop
E-Z Blaster from the pop-up menu, or if you desire to exit the
application completely, click Exit from the pop-up menu.
5. Further Assistance.
To get the most out of your new software, please see the Product Guide.
If you experience problems downloading, installing or running
E-Z Blaster Web Accelerator, consult the Troubleshooting
or FAQ sections for further assistance.
Still having trouble? Feel free to contact us for product setup or feedback.
top
Launching E-Z Blaster Web Accelerator
E-Z Blaster Web Accelerator launches automatically each time you
start Windows. It operates in the background to accelerate your Internet
connection. No user intervention is required.
If E-Z Blaster Web Accelerator is not running and you need to
launch it manually, an icon titled "E-Z Blaster Web
Accelerator" is located in the Windows Start Menu under the E-Z Blaster folder (as shown below).

The E-Z Blaster taskbar icon appears in the Windows taskbar to you
show you it is running.
top
Accessing the User Interface
Once launched, E-Z Blaster Web Accelerator will remain in the system tray (as shown below).
For the most part, during web browsing there will be no need to access the user
interface. You can use the user interface to change settings, view connection
status or acceleration statistics.
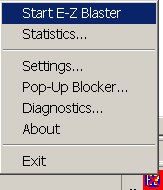
To access the user interface features, click on the
E-Z Blaster Web Accelerator icon in the system tray (shown above). A pop-up menu will
appear (shown below), providing access to all the features of the product.
Selecting and single-clicking any of the menu items will access that particular
feature.

top
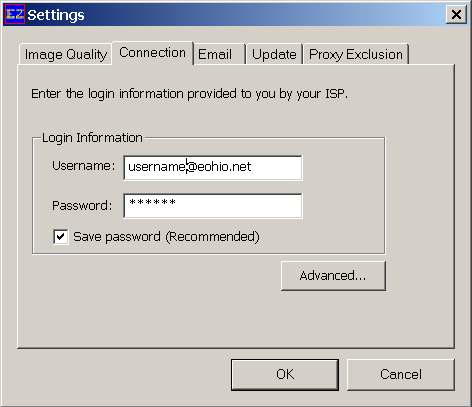
Setting Username and Password Information
Your username and password information is located in the Connection
Status dialog. To set your username and password:
Right-click on the E-Z Blaster Web Accelerator taskbar icon and select "Settings..." from the menu.
-
Click on the "Connection" tab.
Enter your username and password in the fields provided. To avoid having to do this each time you connect, ensure that the "Save password" box is checked.
To save your settings, press OK.
top
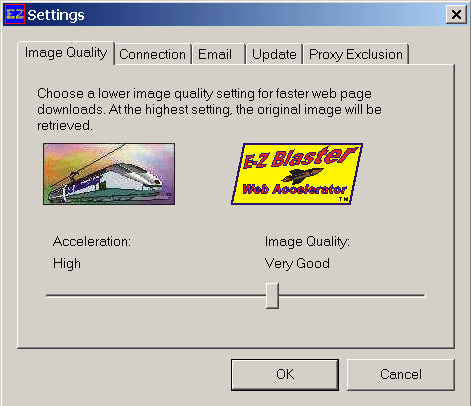
Changing the Image Quality Setting
The image quality setting changes the quality of images that appear in your E-Z Blaster Web Accelerator. The higher the quality you select, the longer it will take the image to load. For slower Internet connections, it is recommended that you lower your image quality. This slider can be adjusted anytime while browsing.
You can easily obtain full image quality for a particular image (described below), so don't be overly conservative about lowering your image quality setting.
Right-click on the E-Z Blaster Web Accelerator system tray icon. See the
product guide if you are unsure how to do this.
Select "Settings...".
Select the "Image Quality" tab.
Use the slider bar to adjust the image quality setting.
-
Press OK to save the settings.
Getting Full Image Quality
Note: The following information applies only when browsing with Internet Explorer.
While browsing, if you would like to request the full quality
image, simply right-click on the desired image from within Internet
Explorer and select "Show Original Image" from the menu (shown below).
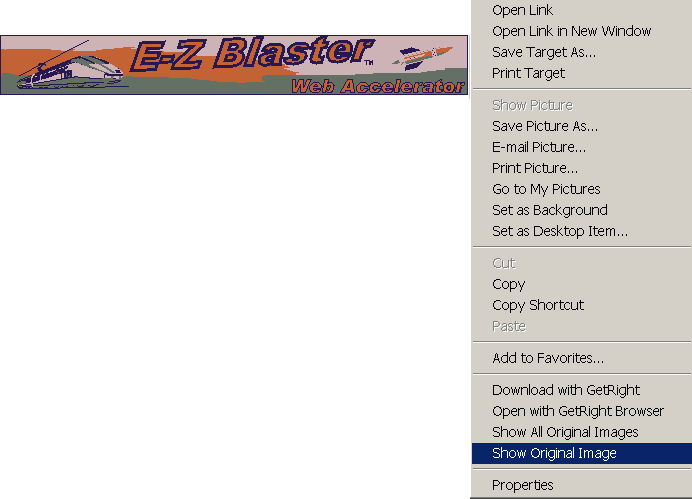
The full quality image will appear in place of the lower quality image (shown below).

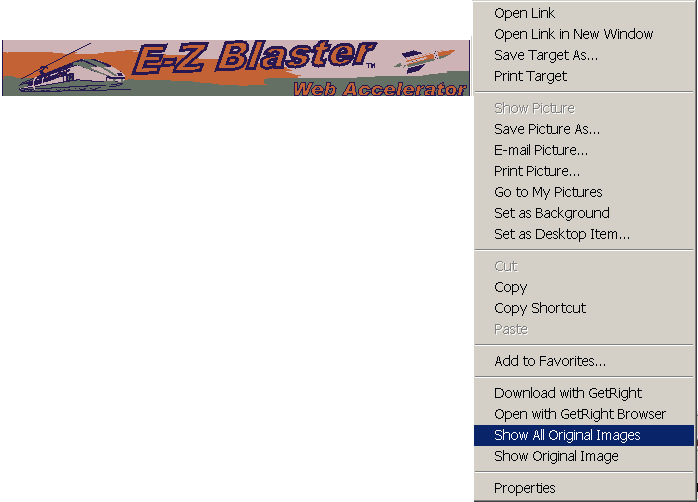
If you want to see the full quality version of all images on the
current page, simply right-click on any image from within Internet Explorer and
select "Show All Original Images" from the menu (shown below).
top
Changing the Pop-Up Blocker Settings
E-Z Blaster Web Accelerator can prevent pop-up windows and floating flash advertisements
from appearing while you browse the Internet. This behavior
is enabled by default, and no user-intervention is required. However, you can
disable these features at any time.
A limited number of web sites require pop-ups to function correctly.
E-Z Blaster Web Accelerator allows you to specify a "White List" of sites where pop-ups
will not be blocked.
You can also see a list of all pop-ups that were blocked. This
information is useful if you suspect a web site is not functioning properly
because pop-ups are being blocked.
Enabling and Disabling the Pop-Up Blocker
Right-click on the E-Z Blaster Web Accelerator system tray icon.
See the user interface section of the product guide
if you are unsure how to do this.
Select "Pop-Up Blocker...".
-
Select the "Options" tab.
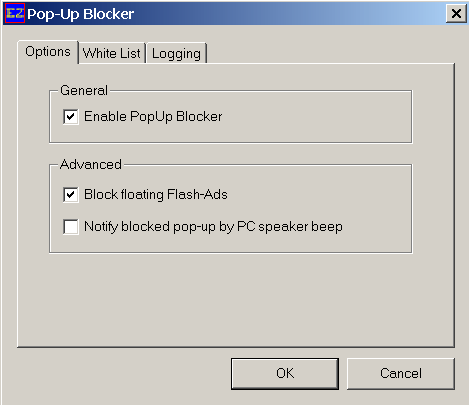
To hear a beep whenever a pop-up is blocked, check "Notify blocked pop-up by PC speaker beep".
To disable the blocking of floating Flash advertisements,
uncheck "Block Floating Flash-Ads".
To disable all pop-up blocking for all sites, uncheck "Enable PopUp Blocker".
Press OK to save the settings.
Disabling the Pop-Up Blocker for Specific Sitesp
Right-click on the E-Z Blaster Web Accelerator system tray icon. See the
user interface section of the product guide if you are unsure how to do this.
Select "Pop-Up Blocker...".
-
Select the "White List" tab.
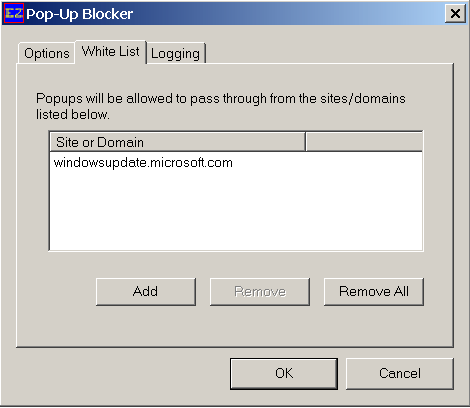
Use the "Add", "Remove" and "Remove All" buttons to manipulate
the White List.
Press OK to save the settings.
Viewing the Pop-Up Blocker Log
Right-click on the E-Z Blaster Web Accelerator system tray icon. See the
user interface section of the product guide if you are unsure how to do this.
Select "Pop-Up Blocker...".
-
Select the "Logging" tab.
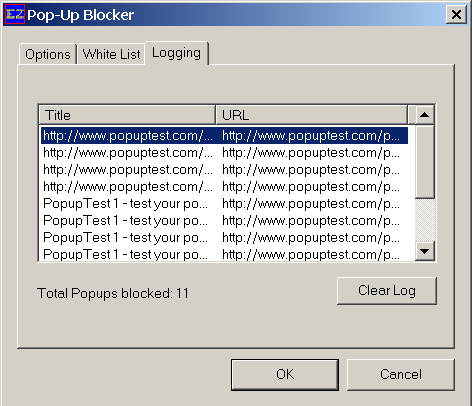
To add a web site to the "White List" so that pop-ups are no
longer blocked from that site, right-click on the site and click "Add to Whitelist".
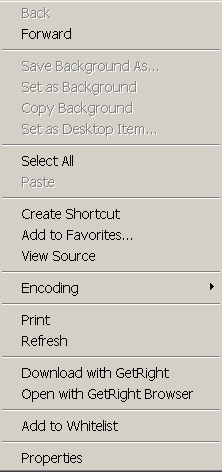
Adding Sites to the White List
You can add sites to the White List within the Pop-Up Blocker dialogs, shown above, or
from within Internet Explorer.
Right-click on any text while browsing within Internet Explorer.
-
Select "Add to Whitelist" from the menu to add the current site to the White List.
top
Starting and Stopping
When E-Z Blaster Web Accelerator is launched it automatically connects.
Occasionally, you may need to stop or start manually.
To Stop:
If you are connected and you want to manually disconnect,
right-click on the E-Z Blaster Web Accelerator system tray icon to access the
pop-up menu. Select the menu item "Stop E-Z Blaster".
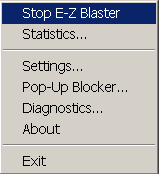
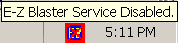
The E-Z Blaster system tray icon will now have a red "X" through it.
To Start:
If E-Z Blaster is stopped and you want to manually start, right-click on the E-Z Blaster Web Accelerator system tray icon to access the pop-up menu.
Select the menu item "Start E-Z Blaster".
The red "X" through the E-Z Blaster system tray icon will disappear.
top
Closing E-Z Blaster Web Accelerator
To close E-Z Blaster Web Accelerator:
-
Right-click on the E-Z Blaster Web Accelerator system tray icon and select "Exit" from the pop-up menu (see below). E-Z Blaster Web Accelerator will disconnect and close. Doing this will not close any open browser windows.
Note: E-Z Blaster Web Accelerator will automatically launch again the next time you reboot your computer.
top
Changing Your Connection Settings
Normally, the connection settings that are set during installation
do not need to be changed. If however, your ISP provides new connection
settings, you may change the preset ones using the " Settings" dialog.
Click on the E-Z Blaster Web Accelerator system tray icon to access the
pop-up menu.
Select "Settings...".
-
Click on the "Connection" tab.
-
Press "Advanced...".
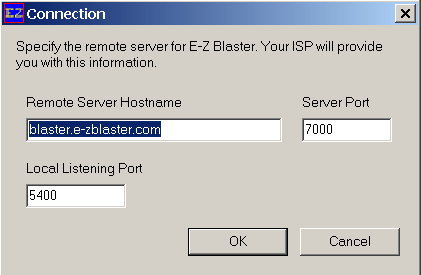
Change the "Remote Server Hostname" and "Server Port" to the
ones your ISP provided you. In most cases, it is unnecessary to change the "Local Listening Port".
Press "OK" to close the "Connection" dialog box.
Press "OK" to save your new connection settings. These settings will be used next time you connect with E-Z Blaster Web Accelerator.
top
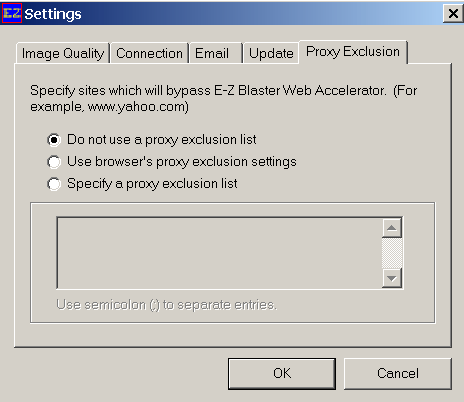
Bypassing E-Z Blaster Web Accelerator for Selected Sites
If you wish to bypass E-Z Blaster Web Accelerator for certain
web sites (web sites on your local corporate intranet, for instance), then simply
select the "Proxy Exclusion" tab on the " Settings" dialog (see below). You
have two options for bypassing sites:
If you have already defined a proxy exclusion list in your
web brower, select "Use browser's proxy exclusion settings" to
configure E-Z Blaster Web Accelerator to exclude these sites as well.
-
You may also "Specify a proxy exclusion list" by selecting this
option. In the given text field, list all the web sites, separated by
semicolons, that you wish to bypass E-Z Blaster Web Acceleration.
Stop and then start E-Z Blaster Web Accelerator.
Note: In step 1, Netscape does not support the wildcard (*)
operator.
top
Accelerating Email
E-Z Blaster Web Accelerator can reduce the amount of time it takes to send and receive email. E-Z Blaster Web Accelerator accelerates email transparently without any user intervention, so you can use your mail program exactly as you normally would. It is compatible with any POP3/SMTP client, including Outlook Express, Eudora and Netscape Mail. Email acceleration is disabled by default.
To enable email acceleration:
Right-click on the E-Z Blaster Web Accelerator system tray icon. See the
user interface section of the product guide if you are unsure how to do this.
Select "Settings...".
-
Select the "Email" tab.
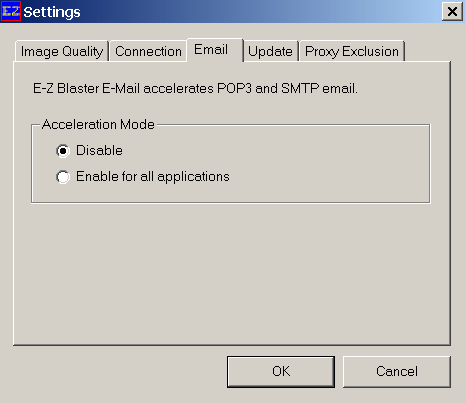
Select "Enable for all applications".
Press OK to save the settings. The changes will take effect the
next time E-Z Blaster Web Accelerator and your mail client are restarted.
top
View Your Acceleration Statistics
You can view the acceleration statistics and how they change
dynamically using the Statistics dialog.
Click on the E-Z Blaster Web Accelerator taskbar icon to access
the pop-up menu.
Select "Statistics...", to display the Statistics summary
dialog.
Click "Reset" to reset the statistics. You may do so at anytime
while browsing without affecting E-Z Blaster Web Accelerator's performance or
operation.
-
Click the "Details" button to view more detailed statistics
information (see below).
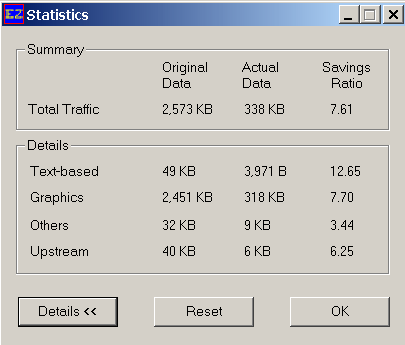
Consult the following table for a description of the values.
|
Original Data
|
Size of the original (uncompressed) data.
|
|
Actual Data
|
Amount of data sent by E-Z Blaster Web Accelerator.
|
|
Savings Ratio
|
Factor of reduction in data. E.g. A savings ratio of 4.00 means your connection
is 4 times faster than a normal connection on average.
|
|
Text-based
|
This row contains compression information regarding text-based content.
|
|
Graphics
|
Contains compression information regarding graphical content.
|
|
Others
|
Contains information regarding content that is neither text nor graphical.
|
|
Upstream
|
Lists the total original and compressed amounts of data uploaded.
|
top
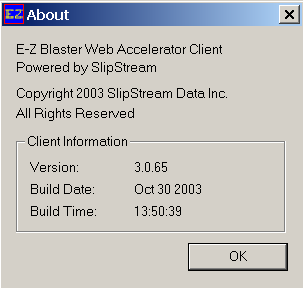
Accessing Product Version Information
You may view the product version in the About dialog.
Right-click on the E-Z Blaster Web Accelerator taskbar icon to access the
pop-up menu.
-
Select "About" to display the About dialog (see below).
top
Updating Software
AutoUpdate will inform you of any major or minor software upgrades to the E-Z Blaster Service. By default, you will be notified of all software upgrades.
If you want to manually update E-Z Blaster Web Accelerator:
Open the "Settings" dialog.
-
Click on the "Update" tab.
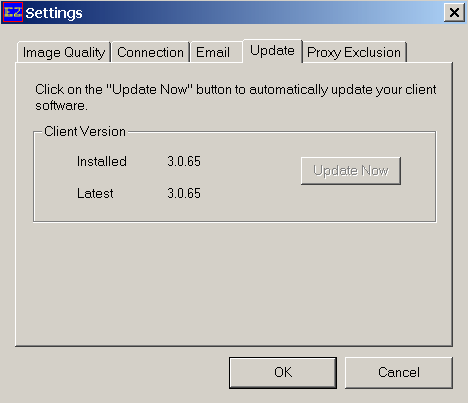
Select "Update Now" to upgrade to the latest version.
Press OK to save the settings.
top
Uninstalling E-Z Blaster Web Accelerator
Under the Windows Control Panel, select "Add or Remove
Programs".
Select E-Z Blaster Web Accelerator and click Remove.
The uninstaller will launch and guide you through the
uninstallation procedure.
top
|